Process, void, and lookup teller transactions.
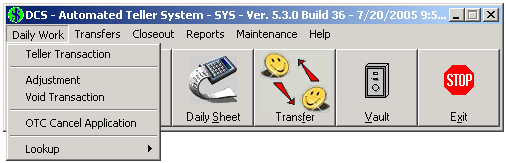
Below is an image of the Daily Work menu. Click any of the menu items to jump directly to that section.
Process a teller transaction.
Click on the Daily button.
Alternatively, click on the Daily Work menu and choose Teller Transaction.
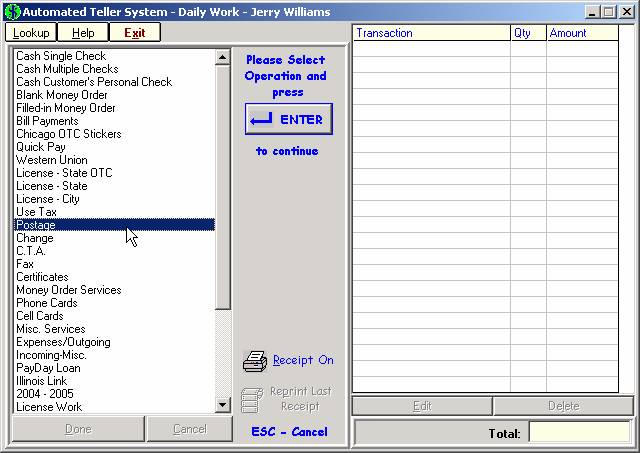
Because different Stores provide various types of services, this menu is customized for each location. For details on customizing a menu, see the Teller Menu section of ATS Setup.
ATS integrates all DCS modules. The transactions of each application are accessible here, through the Teller Menu. They are represented by the following items:
Cash Single Check— Cash a customer check using the Sigcard module. Through Sigcard, customers and makers are tracked and check images are stored, reducing the risk of fraud.
Cash Multiple Checks— Click here when a customer is cashing more than one check.
Cash Customer’s Personal Check— Use this option if the customer is making a check out to the Store.
Blank Money Order— Print a money order with remitter and payee left blank.
Filled-in Money Order— Print a money order with remitter and payee names filled in.
Bill Payments— Process a bill payment. Through BPS, payment information is automatically uploaded to the utility.
Chicago OTC Stickers— Enter an over-the-counter city sticker application.
License Work— Process License plate and sticker transactions.
Payday Loan— Create new loans and track customer payments.
The above transactions are described in detail in their respective documentations.
The remaining items on this menu differ for each Store. Some are common types of transactions while others may be irrelevant depending on location, Store policy, and services offered. The example used here is the sale of a
Double click on the item marked Postage.
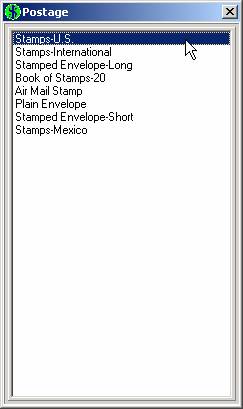
In this example, different types of stamps and envelopes are grouped together under the main menu item Postage. This arrangement provides a cleaner menu setup and a more efficient way to find the correct item.
Use the mouse or keyboard to choose the correct item. Press Enter.
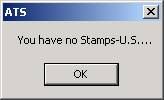
Because inventory is kept for
Use the Inventory Leger to track down the movement of individual inventory items. If necessary, transfer more stamps from the Vault to complete the transaction.
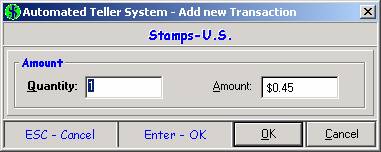
In the case of
Depending on the nature of the transaction, this window contains slightly different fields such as Fee, or Comments. These fields may fill in with defaults like $0.45 in the example above. Sometimes it may be necessary to overwrite this default, whereas at other times it cannot be changed.
Quantity— Generally used for items that are inventoried, where price is constant. This way the cost is calculated by multiplying the two.
Amount— This is the value of the item or service being provided. In the example above, it is used together with quantity to calculate the total cost.
Fee/Charge— The fee is added to the cost for store revenue. A charge is included in the liability and is passed on to a third party.
Comments— Some transactions need an extra field to record check numbers or customer information. It is also used when further specifics are needed to clarify the type of transaction or why it was entered.
Click OK to continue.
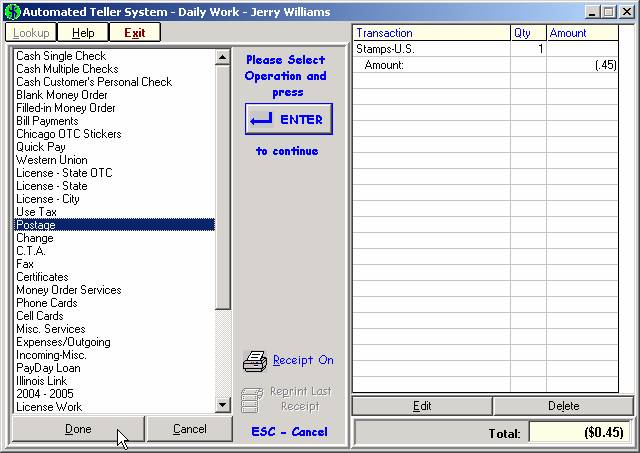
The transaction entered is now listed on the right side of the screen. To process another transaction for this customer, highlight the correct item on the left and repeat the steps above. Otherwise click Done (or one of the buttons described here).
Done— Completes the transaction.
Cancel— Cancels the transaction without saving your work. If more than one transaction has been entered, they are all canceled.
Edit— Return to the previous screen where the user can change the quantity entered. If more than one transaction has been entered, highlight the desired entry with the mouse before clicking Edit.
Delete— Deletes the transaction without saving your work. If more than one transaction has been entered, highlight the desired entry with the mouse before clicking Delete.
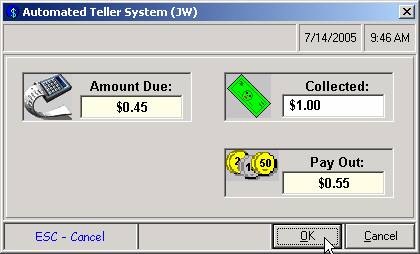
Complete the transaction by entering the amount of cash collected. Click OK or press Enter. The Pay Out field calculates the change due back to the customer.
Finally, click OK to complete the transaction. The receipt prints out and the transactions listed on the right side of the window are cleared.
Create an offset in the Teller Daily Sheet for any type of transaction.

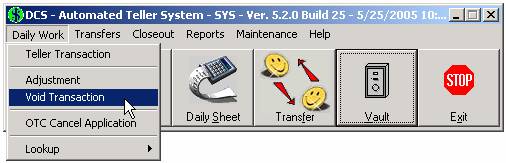
Click on the Daily Work menu and choose Adjustment.
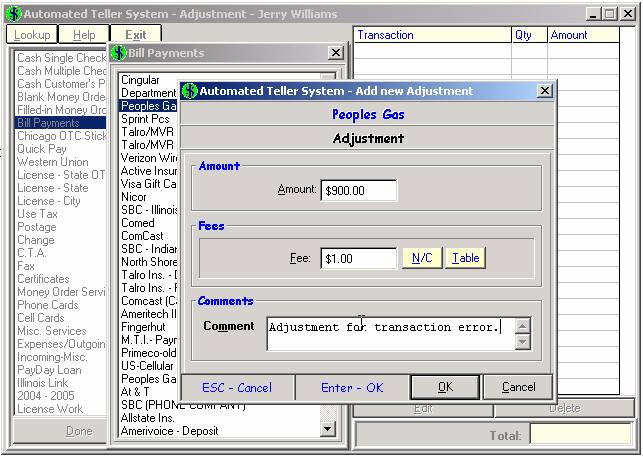
A window comes up that looks and works the same as the Daily Work screen. The major difference is that customer transactions are not being performed here. This is exclusively for Daily Sheet and accounting purposes. Checks are not actually cashed, money orders do not print, and stamps are not sold from here.
Also, only items that post to the Teller Daily Sheet are affected by adjustments. Some customer transactions may not be included in the Teller Daily Sheet depending on how they affect the value of the teller drawer.
Adjustments post in the opposite direction as the transaction. In the example above, a Peoples Gas bill was entered for $900.00 erroneously. Voiding the transaction would fix this, but perhaps the manager wants a record of this on the Daily Sheet. An Adjustment is used in this case.
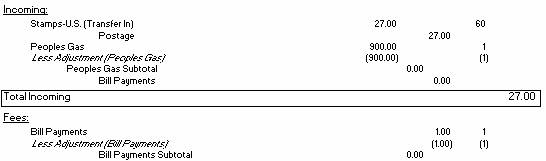
Adjustments post in the same section (Incoming, Fees, or Outgoing) as the transaction. Because a Peoples Gas bill posts in the Incoming and Fees section of the Daily Sheet, the Adjustment does the same. However, the Adjustment posts as a credit instead of a debit to offset the transaction.
Void (or unvoid) a teller transaction.
Click on the Daily Work menu and choose Void Transaction.
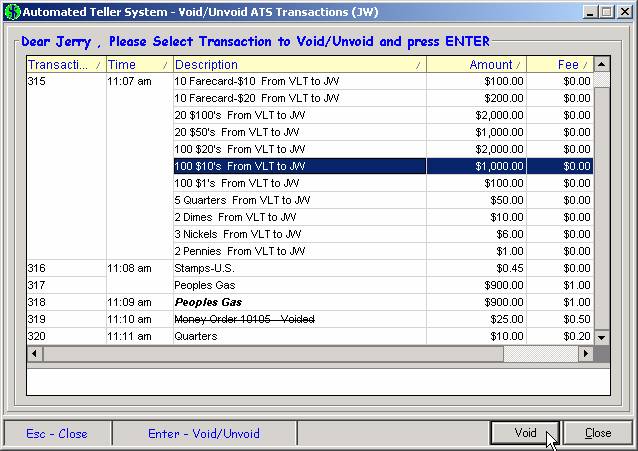
A list of all unclosed transactions appears on the screen in chronological order. A transaction with a line through the description is already voided.
Highlight the desired transaction and click the Void button. A window pops up asking if you are sure you want to void this transaction. Click Yes to void.
Similarly, a transaction can be un-voided. Highlight a voided transaction and the Void button will switch to UnVoid. Click on UnVoid and a window pops up asking if you are sure you want to unvoid this transaction. Click Yes to unvoid.
When multiple transfers have been entered in the same transaction, the following window pops up.
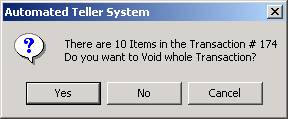
Click Yes to void the entire transaction, or No to void only the highlighted row.
Cancel the application for a sticker that has been sold.
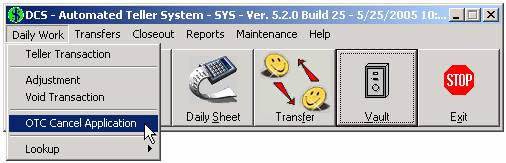
Click on the Daily Work menu and choose the OTC Cancel Application option.
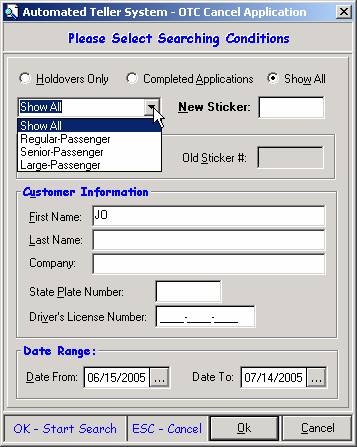
This window allows the user to enter search conditions to locate and cancel past applications.
At the top of the screen, choose Holdovers Only to limit your search to holdover work. Completed Applications searches only the applications where all information is filled in. To bring up both holdover and completed applications, leave the default Show All.
Similarly, a drop down window allows the user to narrow down the search to a certain sticker type. Choose the correct sticker type from this list, or leave Show All to view all types of stickers.
Enter the customer information. It is good practice to enter as little information as necessary on this type of screen. This way mistakes such as misspellings do not overly limit the search, preventing the correct records from being found. In the example here, only the letters “JO” are entered in the first name field.
Finally, the default date range is for the most recent month. Type new dates in the text fields or click on the ![]() to choose the date from a calendar.
to choose the date from a calendar.
Press Enter or click OK to see the results. The OTC Lookup window opens.
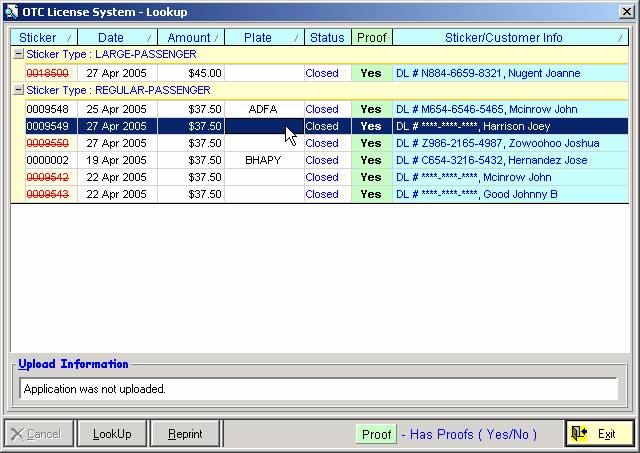
A list appears matching the search conditions entered.
This window displays basic information about the stickers sold. The sticker number, date of purchase, price, and plate number are the first four columns to the left. A sticker number in red with a line through it indicates that the application was canceled.
The Status column displays On Hold for holdovers, Closed for closed-out applications, and Uploaded for the ones that have been successfully uploaded.
The Proof column indicates whether proof was available. Click on the Yes in the proof column to view what type of proof was given.
The Sticker/Customer Info column displays the driver’s license number and customer name for manual entries. For Pre-print forms, it has the pre-print number and the old sticker number.
The buttons at the bottom of the screen provide additional functionality for the highlighted customer.
Cancel— Cancel the application. This application is still available to view but cannot be edited, closed-out, or uploaded.
Lookup— View details for the highlighted sticker application.
Reprint— Prints the sticker as if the transaction was just completed.
Exit—Return to the search window. Please note: the Exit button is the default, so pressing Enter here closes the window.
Search by name and account number for bill payments. View upload and payment information.
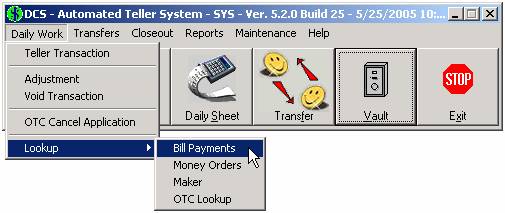
Click on the Daily Work menu and Lookup, choose the Bill Payments option.
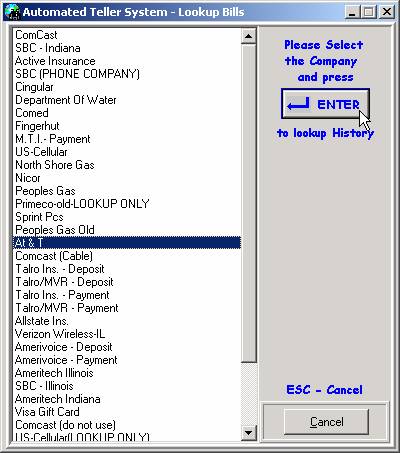
Choose one utility from the list. Press Enter.
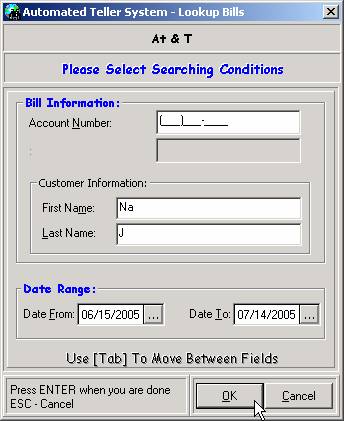
Enter the customer information. Search by Account Number or by Name. It is good practice to enter as little information as necessary on this type of screen. This way mistakes such as misspellings do not overly limit the search, preventing the correct records from being found. In the example here, only the letters “Na” are entered in the first name field, with “J” in the last.
Finally, the default date range is for the most recent month. Type new dates in the text fields or click on the ![]() to choose the date from a calendar.
to choose the date from a calendar.
Press Enter or click OK to see the results.
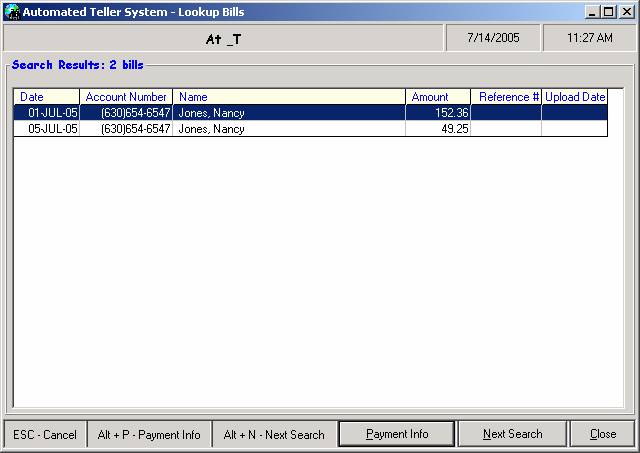
The search results appear. If the desired record is not found, click Next Search and revise the search criteria.
Once the correct bill is found, details are available including upload information. Highlight the record with the mouse and click Payment Info.
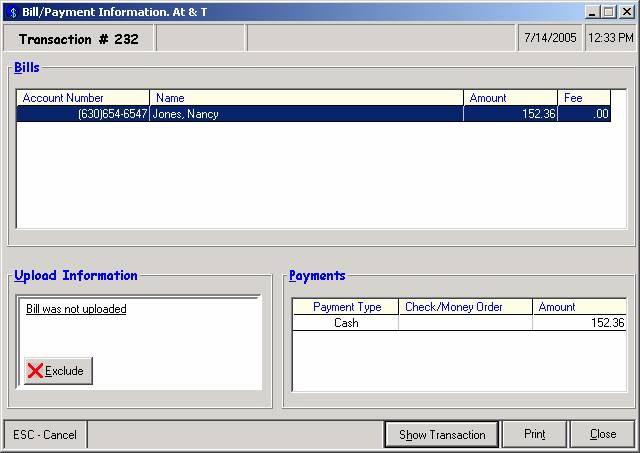
Under the Upload Information section, the user sees whether or not a bill has been uploaded to Firstech. The button at the bottom left allows the user to Exclude (or Include) the selected bill from being uploaded.
Show Transaction— View other transactions placed by the customer at the time this bill was entered. Also view method of payment.
Print— Choose from printing a copy of the receipt, or a report of the data on this screen.
Close— Return to the previous screen.
Lookup money orders by number, amount, and date. View whether or not the money order is cleared.
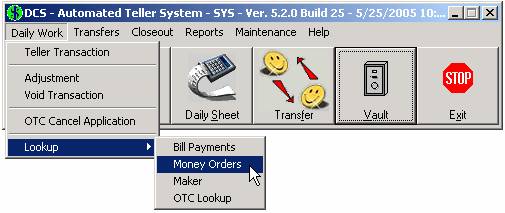
Click on the Daily Work menu and Lookup, choose the Money Orders option.
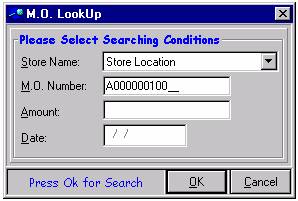
Search for a specific money order or a range of money orders based on conditions entered here.
In the example above, the M.O. Number field is used to find any money order that starts with “100.” The next two fields work similarly. Bring up any money order that matches an Amount, or all that were printed on a certain Date. Complex searching conditions are applied by using a combination of these fields.
Press Enter or click OK to continue.
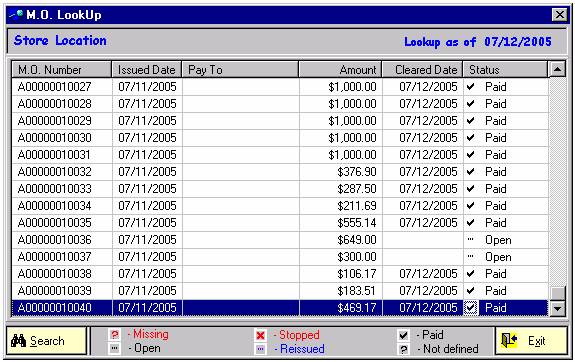
A list of money orders matching the search criteria appears. If the desired record is not found in this list, click Search and revise the conditions.
This screen is most commonly used for the final two columns on the right, Cleared Date and Status. These columns indicate the current state of the money order as it goes from issued to paid. The key at the bottom of the screen lists the six possible values of the Status column. The Cleared Date column populates only for the “Paid” status.
Click Exit to return to the main menu.
Search for and view Makers. Manage account information, flags, and check images.
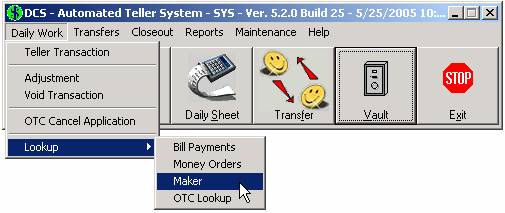
Click on the Daily Work menu and Lookup, choose the Maker option.
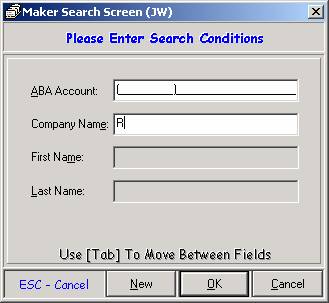
Scan the check into the Magtek to automatically read the ABA. Alternatively, use the Name fields to search by name. Company Name is used for businesses while First and Last is for personal checks. It is good practice to enter as little information as necessary on this type of screen. This way mistakes such as misspellings do not overly limit the search, preventing the correct records from being found.
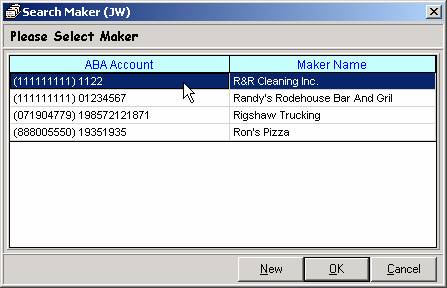
The letter “R” was entered in the Company Name field above, resulting in a list of all makers that begin with “R.”
If the desired record is not listed here, click Cancel and revise the search criteria. Alternatively, click New to add a new maker.
Once the maker is found, highlight it with the mouse and click OK.
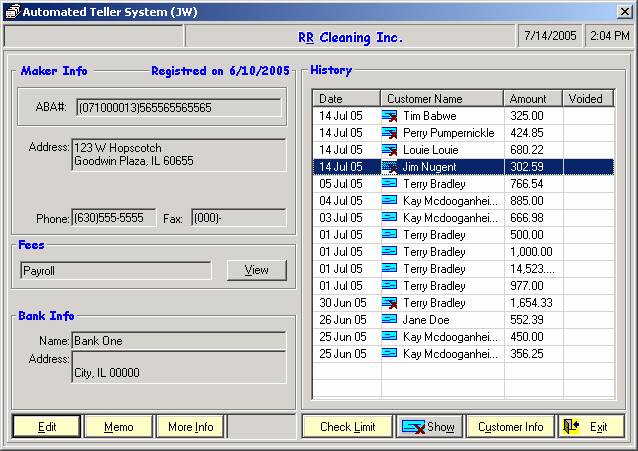
The maker screen is described in detail in the Sigcard documentation. Here, however, is a brief description of button functionality:
Edit— Change maker account information including name, ABA#, address, phone numbers, assigned fee table, and bank.
Memo— Attach a memo to this maker.
More Info— Click here for access to the default check image, flags, and bank maintenance (among other things).
Check Limit— Change the maximum amount allowed for cashing checks by this maker.
Show— View a scanned image of the highlighted check. Only checks with the ![]() next to them have an attached image. The red X means both sides were scanned.
next to them have an attached image. The red X means both sides were scanned.
Customer Info— Bring up the customer screen for the selected check.
Exit— Return to the previous screen.
Lookup, view, edit, and reprint city stickers that have been sold.
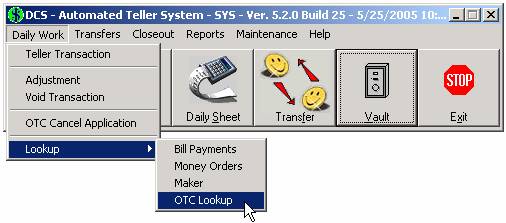
Click on the Daily Work menu and Lookup, then choose the OTC Lookup option. The following window appears.
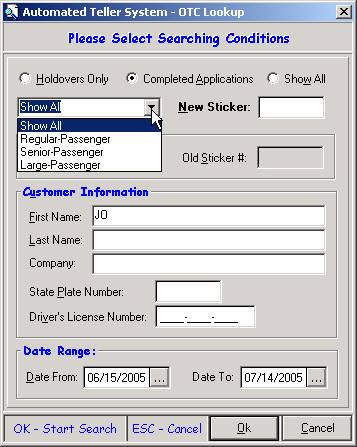
This window allows the user to enter search conditions to locate and view past records.
At the top of the screen, choose Holdovers Only to limit your search to holdover work. The default is Completed Applications which searches only the applications where all information is filled in. Bring up both holdover and completed applications by clicking on Show All.
Similarly, a drop down window allows the user to narrow down the search to a certain sticker type. Choose the correct sticker type from this list, or leave Show All to view all types of stickers.
Enter the customer information. It is good practice to enter as little information as necessary on this type of screen. This way mistakes such as misspellings do not overly limit the search, preventing the correct records from being found. In the example here, only the letters “JO” are entered in the first name field.
Finally, the default date range is for the most recent month. Type new dates in the text fields or click on the ![]() to choose the date from a calendar.
to choose the date from a calendar.
Press Enter or click OK to see the results. The OTC Lookup window opens.
A list appears matching the search conditions entered. If the desired record is not seen here, click Exit and enter a new set of search conditions.
This window displays basic information about the stickers sold. The sticker number, date of purchase, price, and plate number are the first four columns to the left. A sticker number in red with a line through it indicates that the application was canceled.
The Status column displays On Hold for holdovers, Closed for closed-out applications, and Uploaded for the ones that have been successfully uploaded.
The Proof column indicates whether proof was available. Click on the Yes in the proof column to view what type of proof was given.
The Sticker/Customer Info column displays the driver’s license number and customer name for manual entries. For Pre-print forms, it has the pre-print number and the old sticker number.
The buttons at the bottom of the screen provide additional functionality for the highlighted customer.
Cancel— This button is disabled. To cancel an OTC application, see the OTC Cancel Application section.
Edit / Lookup— Allows the user to edit or complete an application. See the OTC documentation for details on filling out applications. For canceled applications, the information can be viewed but not edited.
Reprint— Prints the sticker for this transaction.
Exit—Return to the search window. Please note: the Exit button is the default, so pressing Enter here closes the window.
Return to ATS Home