Release 7.3.0 build 101
Click here for upgrade instructions. This version will be available for download starting Monday, September 25.
How will
this affect me today?
New Install Shield – easier to
upgrade and user error eliminated
If Firstech upload is bypassed,
receipt number does not print
Don’t add leading zeros to BPS
companies
Attention out-of-State Coinstar
users
Adjustments made to Coinstar
prepaid products—Cell Cards and PINS
I.C.E. Gift and Reloadable Cards
BPS set up to handle a lot more
companies
Compatibility
with new Secretary of State form.
The December Discount is now
implemented
Mark sticker as sold with manager
password
Combine Store Daily Sheets for
multiple dates
How
will this affect me today?
New Install Shield – easier to upgrade and user error eliminated
The “Install Shield” is the name of the wizard that pops up and walks you through the upgrade process. In other words, it’s the window that asks if you agree to a licensing agreement, and then you click Next, Next, Next, Finish. It makes upgrading to a newer version of our software much easier than the old DOS way of doing it, where commands would have to be keyed in at a command prompt.
For past DCS upgrades, the only tricky part was the screen where you have to choose between Typical and Custom. Typical was done on all the computers except that one special one called the Support Station. Now, with this release, this step is no longer necessary. With the new Install Shield Wizard, the system auto-detects which applications have been installed on your computer, and then installs that same set of programs. This way, as long as your system is working the correct way now, it will continue to work fine after the upgrade. The typical mistake of forgetting to install a certain element has been averted.
Comed Expedited Payments
Though this release will contain
all the software changes required for taking ComEd Instant payments, this new
feature will not be activated for several more weeks. This is due to
increased testing requirements of ComEd, and will provide for a more assured
error-free roll-out. No action will be required on your part to activate
the functionality. We apologize for the delay, but are confident the wait
will be well worthwhile! Look for an email bulletin the week of Oct. 9,
for full activation beginning the week of Oct. 16.
Since this program is specifically sanctioned by ComEd, your locations are now officially “Convenience” locations for the purposes of taking ComEd BPS “Instant Payments”. The same will be true for other Billers on BPS that will have this availability in the near future. We will include marketing materials downloadable through this web site for you to print out and utilize as we approach the October date.
Click here for more information on ComEd
Instant Payments.
New License Form
A new form was distributed (throughout mid to late September) that combines several forms into one. The RUT-25 and RUT-50 forms are the only ones that have been left unchanged. For those stores using the License Module, you can print onto the new forms with this release.
IMPORTANT
Do not upgrade until you have this form on hand. Once upgraded, your system will not be able to print onto the older forms. If you are not sure whether the form you have is the new one, click here to view a screenshot of it.
If Firstech upload is bypassed, receipt number does not print
A few locations have chosen to not upload certain utility payments to Firstech. Instead, they are using BPS for record keeping only, mailing checks and money orders directly to these utility companies. The receipt number led customers to believe that their payment was being sent through an upload, rather than the slower method of mail. Customers would call Firstech (using this receipt number for verification) even though Firstech never received or processed the payment. This caused confusion for both the customer and for Firstech.
With this release, any company set to “Do Not Upload” will not have a receipt number on the receipt. This will help prevent customer confusion for lost or late payments, and take the burden off Firstech for those payments they are not responsible for.
Don’t add leading zeros to BPS companies
In order to ensure that payments are not sent to the wrong biller, DCS and Firstech ask that you no longer “zero pad” any payments. Zero padding refers to the method of adding leading 0’s to account numbers that are too short to fit the mask. With the improvements made to BPS over the past few releases, account masks are now flexible and customizable to the point where every valid account number should be accepted (without these types of quick-fixes made by the user). ***Customers using the Dept. of Water company can still zero pad if absolutely necessary—this is the one exception to the rule.
Attention out-of-State Coinstar users
DCS has changed the logic of how
commission is calculated for Coinstar products (cell cards and PINs). The reason this was necessary is described in
detail below. Due to state laws (of how tax is passed to
the government), the change has different affects
based on location. Stores outside the
State of
Out of State stores, click here for instructions on changing this setting.
BPS
ComEd Instant Payments
ComEd bills can now be processed within an hour of payment. This means that within one hour from the time the receipt prints, ComEd will be notified of the payment. Customers who are close to their service being discontinued benefit the most from this, but also those who want to avoid late payment fees.
While the functionality is there as of this release, the internal setting will not be switched on until mid-October. DCS and Firstech are working hand-in-hand to get this available soon, but want ensure that this new process is tested thoroughly before deployment. Once switched over, all stores will immediately begin to process ComEd payments in this new way. If, for some reason, an owner would like to revert to the old method, please contact DCS technical support.
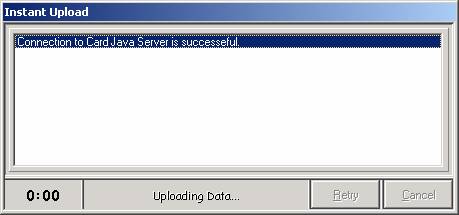
There is nothing different the teller has to do to process these payments. The only differences he/she will notice is that the fee will change to $1.50, and the above screen will be displayed for a few seconds while the bill is uploaded to Firstech (in real time). The $1.50 is the default fee, and it is the fee DCS recommends for these types of payments. Fees can be changed from the BPS Company Setup screen. Please consult your BPS online help for further instructions.
Personal checks cannot be collected and sent directly to Comed for Instant Payments. Due to the nature of Instant Payments, cash should be collected and included in the utility-account money order.
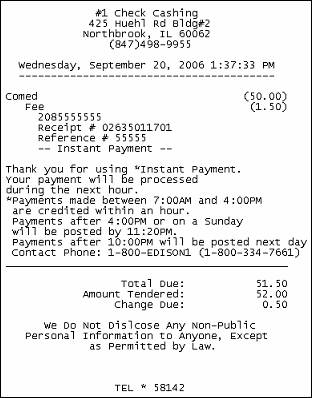
The final noticeable change is the statement printed on the receipt. It is a statement explaining the new payment and the times it is in effect.
SAMPLE RECEIPT
Adjustments made to Coinstar prepaid
products—Cell Cards and PINS
BUG FIX
Due to a limitation with I2C (the Coinstar Processor), the commission structure sent out to the stores was not 100% accurate. For each product, the commission came in at an amount less than the actual commission. The difference was by the amount of the sales tax. To account for this, DCS now adds the sales tax to the incoming commission, thereby creating the correct commission. From a user standpoint, money orders and reports will now show the correct commission.
Realizing that different commission structures were being exported based on the sales tax of that area, another program change was required…
Overwriting
the Commission
Until this release, the first commission assigned to a product was saved and would not be overwritten through automatic downloads. This worked fine for most locations, but for those organizations using the Daily Sheet System, menus were exported based on a single area’s sales tax. Because the commission structure is based on the sales tax for a given location, those with a different sales tax (from the main office) received a commission structure that was slightly off.
With this release, any changes to the existing commission structure will be overwritten. BPS automatically downloads and imports something called the “Prepaid Products List” at the time of closeout. This ensures that all commissions will be kept up-to-date for all locations.
Out of State Locations – Setting must be
adjusted
Most out-of-state stores do not pay
sales tax through Coinstar. Because of
this, the commission changes just described effect these stores
differently. The default setting is set
for
From the BPS main menu, click on Company Setup.
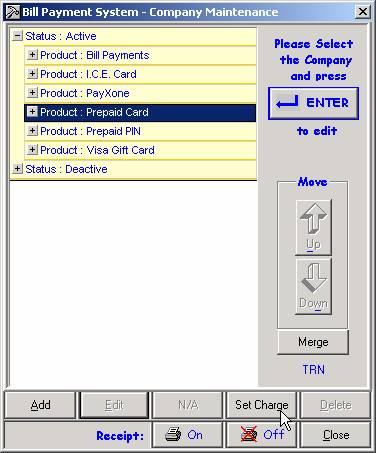
Highlight the Product : Prepaid Card option by clicking on it with the mouse. Then click the Set Charge button.
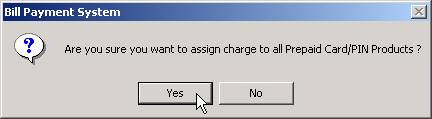
Click Yes to assign a charge to all Prepaid Card/PIN Products.
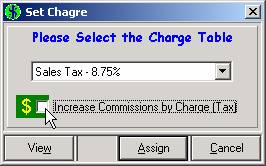
The checkbox Increase Commissions by Charge (Tax) will initially be checked by
default. Any stores outside of
NOTE: The other setting you see here is the drop down menu for assigning sales tax. If, for some reason, this has not been set yet, choose the correct sales tax percentage from the drop down menu.
New Type of Prepaid Card
A new type of card can now be sold through the BPS System. That is the I.C.E. card. There are two main types of I.C.E. cards available—the gift card and the reloadable card. The only difference between these two cards (besides the way they look) is that the gift card cannot be reloaded.
I.C.E.
Setup
Bulletins will be sent out with information on activating an I.C.E. card account. Once a valid account is established, you will be given a PIN number which must be registered. To do this, open the POS Card Server and choose Properties from the File menu.
NOTE: Registering to sell I.C.E. cards will simultaneously deactivate your Visa Gift Card menu option. Be sure you have I.C.E cards in stock and are ready for the switchover before proceeding with the setup instructions.
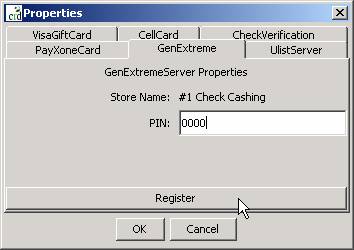
From here you will find a number of tabs corresponding to different services offered through BPS. One of them is called GenExtreme. Key your PIN number into this field, then click the Register button.
The rest of the setup is done through BPS. Log in to BPS and from the Maintenance menu, click on Import I.C.E. Cards.
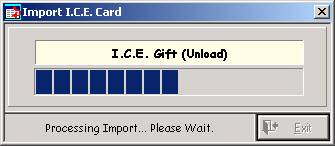
Several I.C.E services are displayed as the blue status bar moves from left to right across the screen. This step should only take a matter of seconds and will automatically return to the main BPS menu once complete.
From the transaction menu, a new submenu called I.C.E. Card should now exist. Within the submenu are four items:
I.C.E. Gift
I.C.E. Gift (Unload)
I.C.E. Reloadable
I.C.E. Reloadable (Unload)
I.C.E. cards can be either loaded or unloaded, and because there are two types of cards (Gift and Reloadable), there are 4 total services.
Loading
the I.C.E. Card
The process of loading a card is similar to Visa Gift Cards—the store collects cash and loads it onto the card.
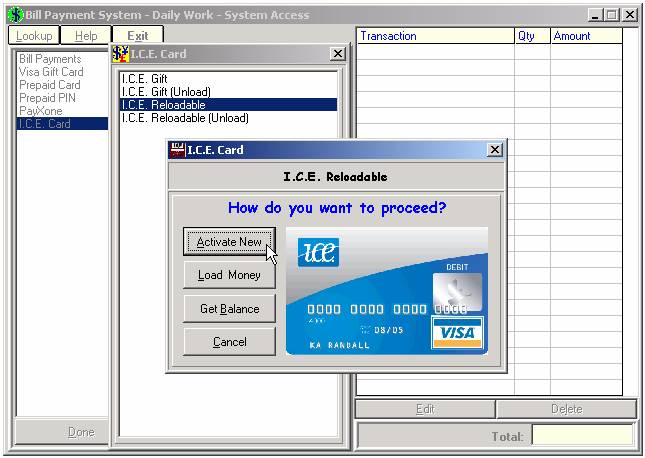
The screenshot above is for the I.C.E. Reloadable card. The same options are available for the Gift Card, except Load Money, which is used to add more funds to an already activated card (a feature specific to Reloadable cards).
To load a card for the first time, click the Activate New button.
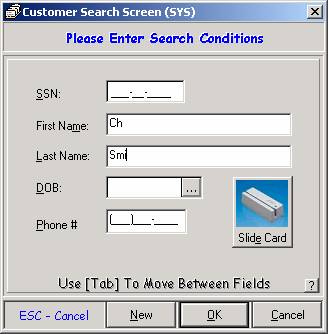
The customer search screen appears. This is to record the customer information in order to comply with BSA and OFAC rules and regulations.
There is no need to fill in all the fields above— the system will display any records matching your search criteria. Key in a few characters of the customer’s first and last name, then click OK. If none match, the customer must be entered as new.
NOTE: These search screens should be familiar to any ATS, Sigcard, or License users. For more information on customer search or on adding new customers, see the online Sigcard documentation.
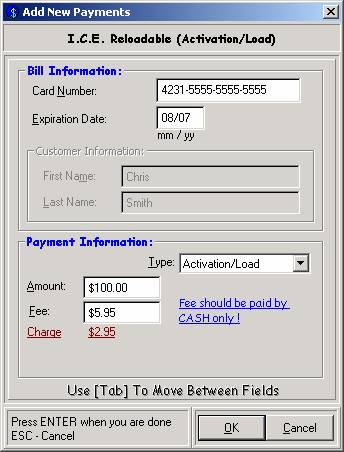
Once the customer record is found (or entered as new), key in the card number and expiration date.
For the initial load, whether the card is a Gift or a Reloadable, the minimum amount is $20.00. After that, there is no minimum for additional reloads.
Unloading
the I.C.E. Card
The unload is similar to using an ATM machine (in that cash is removed from the card for a fee).
Choose between the two unload options based on the type of card.
I.C.E. Gift (Unload)
I.C.E. Reloadable (Unload)
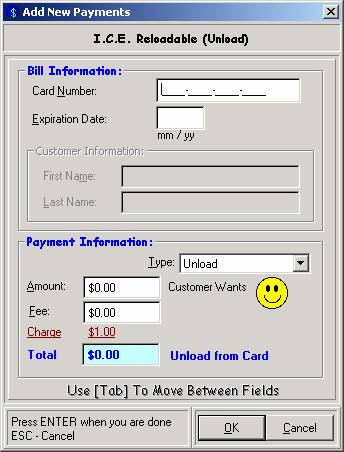
The customer information must be recorded for all I.C.E. unloads. Therefore, the customer search screen appears (as described in the previous section) before the above screen is displayed.
The card must be present so that it can be swiped through the card-stripe reader. The card number auto-populates once swiped. There is no minimum for the amount that can be unloaded, and the max is the amount currently on the card.
BPS set up to handle a lot more
companies
The company list in your BPS menu is based on those that Firstech is set up to process. This list is going to increase in size as Firstech is able to process bills for a larger number of companies. This will obviously be beneficial to stores as they are able to take a greater variety of payments. It also means that other regions of the country will be able to use BPS (and upload their bills) in the same way as local stores.
DCS has made changes in recent releases in preparation for this larger list of companies. DCS and Firstech are working together to complete this project, and will keep you informed as to when a bigger company list is available.
IMPORTANT
In order to ensure that payments are not sent to the wrong biller, DCS and Firstech ask that you no longer “zero pad” any payments. Zero padding refers to the method of adding leading 0’s to account numbers that are too short to fit the mask. With the improvements made to BPS over the past few releases, account masks are now flexible and customizable to the point where every valid account number should be accepted (without these types of quick-fixes made by the user). ***Customers using the Dept. of Water company can still zero pad if absolutely necessary—this is the one exception to the rule.
License Module
Compatibility with new Secretary of
State form
New License forms should have arrived as of mid to late September. This new form combines several of the previous forms into one. Only the RUT-25 and RUT-50 forms have been left unchanged.
IMPORTANT!
Do not upgrade until you have the newest form on hand. Once the upgrade is complete, the older forms will no longer be compatible with your system.
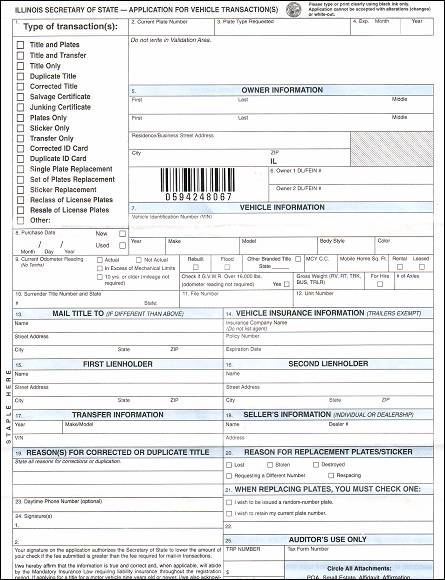
There is one part of this form that will be left blank, and that is the “Type of Transaction(s):” box found in the top left corner. Because the check boxes are so close to one another, and the fact that the box marked determines which service is being requested, DCS left this part to be filled in by hand. This way, if the alignment happens to be off by a few millimeters, the form won’t be rejected by the Secretary of State.
How To Align Your Printer
It may be necessary to adjust your OKI 320 Turbo printer to align the printout with the form. This is the one time process of moving the position of the form (up and down, left and right) so that the text prints onto it correctly.
Test printouts are sent from the support station, which is the computer running DCS Net. Only one computer at each location should have DCS Net installed on it.
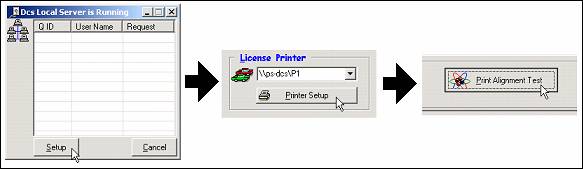
From the DCS Net screen, click Setup, then on Printer Setup, and when the form is in the printer, Print Alignment Test.
There are two vertical, grey bars along the top of the OKI, holding the form in place as it is fed into the printer. These bars should be set to the exact width of the form, just loose enough for the form to slide into the printer. After the Print Alignment Test button is pressed, generic data will be printed onto the form. The printout will probably not be lined up on the first try-- usually some adjustments must be made. The idea behind aligning the printer is to print out one of these tests, adjust the printer, and repeat this again and again until the printout is lined up with the form.
The grey bars themselves are used to adjust the left-right alignment. If the printed text is too far to the left, the bars must be moved to the left. If the text is too far to the right, the bars must be moved to the right. Once you are satisfied with the left-right alignment, it is a good idea to make a mark on the printer (with tape or with a marker) so that you don’t have to repeat this procedure.
The up-down alignment is done using a combination of buttons on the printer. On the front of the printer, find the one labeled Shift, and the ones labeled Micro Feed Up and Micro Feed Down. By holding down the Shift key and pressing Micro Feed Down, the form is inched downward. The Shift + Micro Feed Up moves it upward.
If the text that printed is lower than its spot on the form, you will have to use the Shift + Micro Feed Down to adjust the alignment. This moves the form down, thereby raising the printed text.
If the text that printed is higher than its spot on the form, you will have to use the Shift + Micro Feed Up to adjust the alignment. This moves the form up, thereby lowering the printed text.
OTC Chicago
City
The December Discount is now implemented
A new date range has been defined
by the City Clerk in which residents can get an additional discount. From December 1st through March 31st,
an intermediate discount is available for new
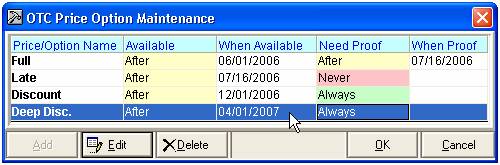
After upgrading, no further action is required for this change to take affect. The dates and values are automatically adjusted, and the fee is set to the standard $5.50. This fee can be adjusted from the Transaction Setup screen.
Mark sticker
as sold with manager password
When placing the transaction, the next sticker number in the batch will automatically populate the field. This number is obtained from the Sticker Batch Setup screen, which you can get to from the Setup menu.

Occasionally the next sticker in a batch is lost, defective, or sold manually. When this happens, it is necessary to mark that sticker as sold so that the next valid sticker number populates the field. To do this, find the row based on the batch numbers and click on the cell in the Total column.
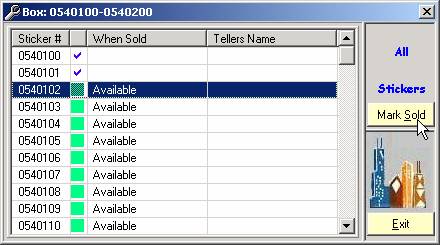
Highlight the row for the missing/invalid sticker and click the Mark Sold button. This feature requires a manager level password as this sticker will no longer be available for sale.
ATS
Combine Store Daily Sheets for multiple
dates
A new reporting feature combines several sequential Daily Sheets into one. Prior to this release, Store Daily Sheets could only be viewed for a single closed-out session. Choosing multiple sessions from the date selection screen would not combine the individual daily sheets, it would simply display them one at a time.
FOR EXAMPLE
Accountants sometimes request a monthly Daily Sheet, where the cash at open corresponds to the first day’s opening cash, and the cash at close corresponds to the last. The Fees section, in this example, would equal the total amount of fees accumulated throughout the month. Viewing these types of cumulative Store Daily Sheets is now possible.
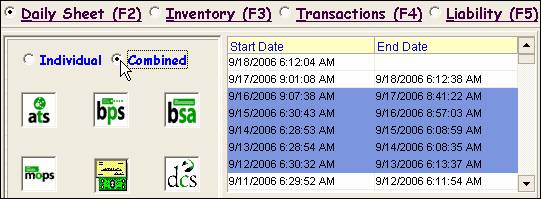
To do this, to the ATS System Reports screen, found under the Vault menu. Simply choose the first session in the sequence, then hold down the Shift key and click on the last. All sessions in between the two are selected. Then, as seen in the figure above, be sure to choose the Combined option.
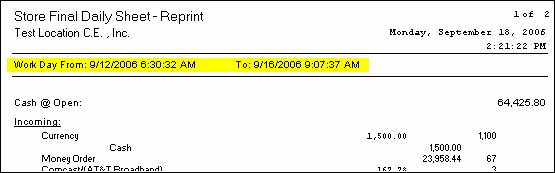
A single Daily Sheet is generated. Take note of the Work Day row, highlighted in yellow for this example.
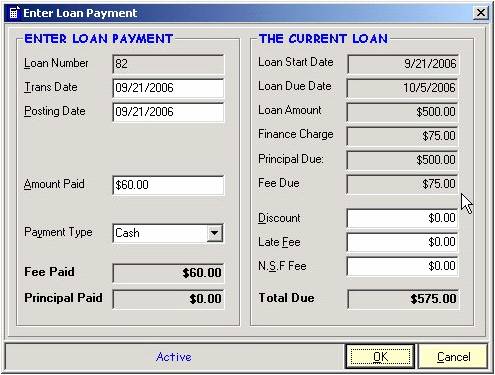
Payday Loan
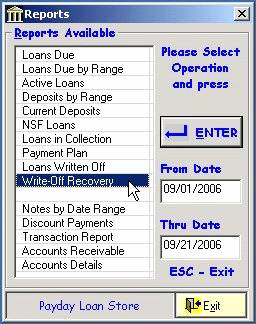
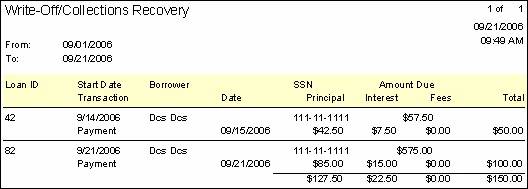
Write-Off Recovery report
The Write-Off/Collections recovery report was added to the Payday system to give users an accurate depiction of recovered funds from loans that had been 'sent to collections' or 'written off' in the system.
Partial Payment
When accepting partial payments for loans, there is no longer a minimum to pay towards the balance. Previously, the customer's minimum payment had to be greater than or equal to the Fee.