ATS Setup
Transaction Templates
and DS Templates
Vault Menu –General
Rules of Thumb
Vault Menu –What is set to
Post?
Teller Menu –Fees,
Charges and Commissions
Teller Menu –Money
Orders at Closeout
Teller Menu –What is set
to Post?
Daily Sheets – Behind the
Scenes
Daily Sheets – The
Teller and Vault Templates
Daily Sheets – Grouping
and Subtotals
Daily Sheets – The Store
Template
Section 1:
Templates
Transaction Templates and DS Templates
There are two sets of
templates, the Transaction Templates and the Daily Sheet Templates. The Transaction Templates are used to set up
inventory transfers and to process customer transactions. The Daily Sheet Templates are used to
calculate the value of the Teller, Vault, or Store at any given time. These two different sets of templates
(Transaction and Daily Sheet) do not work independent of one another— they are
inextricably linked together.
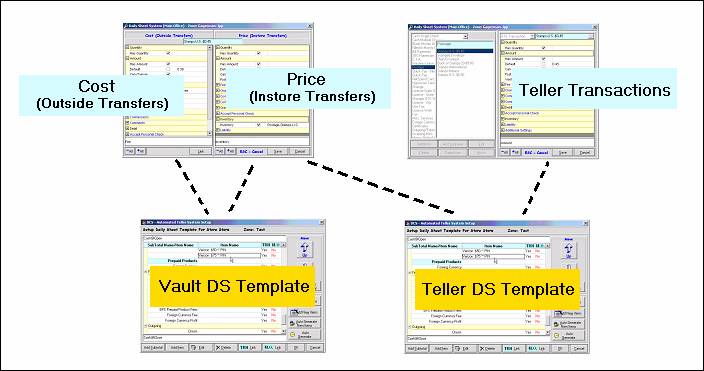
Three Transaction Templates
There are two main places
where inventory is kept within the store (i.e. the Vault and Teller
Drawers). First time users would think,
therefore, that only two transaction templates are needed—one for the Vault and
one for the drawers. The reason there
are three templates (and not two) is that each template represents a movement
or exchange from one place to another.
If we were to follow the
movement of a single stamp, from the time it is delivered to the store to when
it is sold to a customer, we would see three
different transfers.

Any inventory must initially
be brought into the Vault. Looking at
the diagram above, the Cost (Outside
Transfers) template is used to set up transfers from Banks and Vendors to
the Vault.
Once the stamp has been
brought into the Vault, it can’t be sold until it is transferred to the Teller
Drawer. This is where the Price (Instore Transfers) template
comes into play. This template is used
to set up any transfers within the store.
All inventory items reside in the Vault or Teller Drawer, and this
template is used to move items back and forth between the two.
Finally, the stamp is sold to
the customer. This is where the Teller Transactions template is
used. There are hundreds of different
types of teller transactions— each affecting the teller drawer differently. This template can be set up to account for
every one of them.
Vault Menu, Teller Menu
When creating a Vault
transaction, there are two Transaction Templates to set up—the Cost (Outside
Transfers) AND the Price (Instore
Transfers). When creating a Teller
transaction, there is only one. Why is
that?
They are divided up like this
for one reason: Inventory. Any time we are keeping inventory for an
item, it must have a spot on the Vault menu.
(You could also say that the only reason the Vault exists is to hold
inventory items.) The Price (Instore Transfers) template is
for inventory transfers between the
Vault and Teller drawers. Not every
teller transaction affects inventory, but
every Vault transaction does affect inventory. This is why the Price (Instore Transfers) is
included in the Vault menu.
The Daily Sheet Templates
There are three different
daily sheets that can be viewed in ATS— the Teller, Vault, and Store.
The Teller Daily Sheet displays the cash at open for a single user, all
the debits and credits that affect their drawer value, and the cash at
close. Similarly, the Vault Daily Sheet
reflects the value of the Vault at any given time. The Store Daily Sheet is the total value in
the store— that is, the total of all drawers and the Vault. Because there are three different types of
daily sheets, there are three different Daily
Sheet Templates.
Let’s start with the Vault
and Teller DS Templates.
The value of the Vault can
only change through transfers. Either
transfers with Banks/Vendors, or transfers with a Teller Drawer. This is where we see the direct connection
between the Transaction Templates and the DS Templates. Any item set to post in Cost (Outside
Transfers) or Price (Instore Transfers) gets a corresponding spot on the Vault DS Template.
Similarly, the value of the
Teller Drawer changes when items are transferred into or out of the Vault, or
through customer transactions. Looking
at the diagram above, the two transaction templates that affect the Teller DS are the Price (Instore
Transfers) and Teller Transactions.
The Store DS Template does not have a direct connection with the Transaction Templates. Instead, the
Store template is made up of all the links in the Teller and Vault Daily Sheet Templates. The reason for this is simple. The value of the store is based on the total
cash-value of the Vault and all the Teller Drawers combined.
Section
2: The Vault Menu
Vault
Menu – The Basic Setup
The Vault is used as a
centralized place to keep inventory. Any
time the price or fee changes for an inventory item, or when an entirely new
item is being added to your menu, the transaction templates must be adjusted. The Vault Menu is set up so that all the
relevant settings can be changed from one screen.
Start by clicking on the Vault Menu button. The Zone Selection screen
appears. Choose the zone that applies
and click OK.
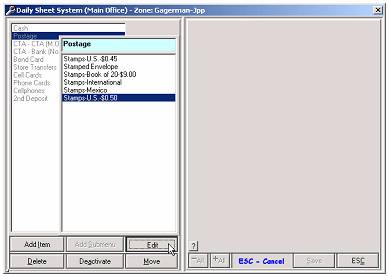
Navigate through the menu to
the item you would like to Add/Edit. For
information on setting up and arranging items into submenus, see Appendix B: Arranging the
Transactions.
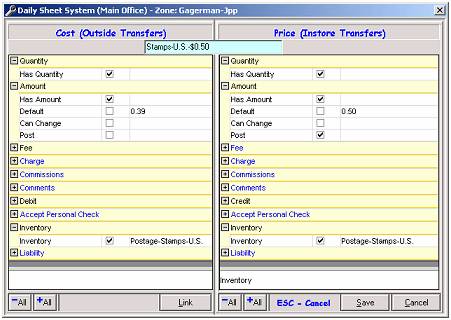
Vault transactions are set up
using two templates. One is for
inventory transfers between Banks/Vendors and the Vault, found on the left side
of the screen under Cost (Outside
Transfers). The other, on the right
hand side, is for transfers between the Vault and Teller Drawer. This one is called Price (Instore Transfers).
These two templates work hand-in-hand in controlling the flow of
inventory as it passes through the Vault.

Vault Menu –General Rules of Thumb
Template Layout
There are a total of ten yellow
bars that can be expanded or collapsed by clicking the plus or minus
symbols. Some of the options are set by
simply checking a box or keying in an amount, while others (fees, charges,
liabilities, and inventory) require you to choose from a list of existing
tables or names. Access this list by
clicking on the gray button with the three dots on it, as seen here.
Inventory
Inventory is nothing more
than a count of how many of this
item, and how many of that
item. It is all about quantity— we brought
ten of this item into the Vault, transferred three to a drawer, and sold
one. Now we have seven in the Vault, and
two in the drawer.
When initially setting up an
Inventory Group, it doesn’t matter what name you choose. Simply key in something that accurately
depicts the item at hand. If there is
already a group with an accurate name, and it is not currently being used by
another transaction, use that one. All
newly created Inventory Groups have a zero count across the boards— zero in the
Vault and zero in each Teller Drawer.
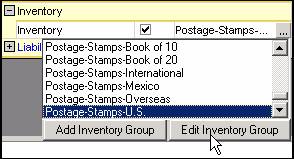
Except in some very special
circumstances, every item in the Vault menu carries inventory. Therefore, the Inventory field should be checked with the Inventory Group of your
choosing. Even though both sides of the
screen have an Inventory checkbox, checking one causes both of them to be
checked, and they will also have the same Group tied to each.
Quantity
Checking the Quantity field allows the user to
easily process multiples of this transaction.
It generally makes sense to allow the user to specify quantity when
dealing with inventory for an obvious reason— inventoried items tend to be
moved around in large quantities. Bringing 200 stamps into the Vault would be
very time consuming if the user had to enter them individually (transfer 1
stamp, transfer 1 stamp, transfer 1 stamp, transfer 1 stamp, transfer 1 stamp,
transfer 1 stamp, transfer 1 stamp…).
Can Change
There is a Can Change checkbox included in the
Amount section. Just like it sounds, this
allows the user to change the Amount at the time of the transfer. On the right side of the screen, for
transfers between the Vault and Teller Drawer, Can Change should never be checked.
If prices were allowed to change as items are transferred within the
store, the Daily Sheets would not balance.
Debit/Credit
The left side of the screen
should always be set to Debit. The right, Credit.
Vault
Menu – Amount and Fees
Setting
the correct Amount and Fee throughout the different
transaction templates can be confusing.
When do we use the cost, and when do we use the price? Where do we put the fee?
It
is actually quite easy once we determine when
the fee is realized. There are only
two different ways to do this. The first
option (and the more common one) is realizing the fee when the inventory is
brought into the Vault. The item is then
carried at the customer price, and an additional fee is not charged when it is
sold to a customer. The second option is
carrying the item at cost, and then realizing the fee at the time of customer
transaction.
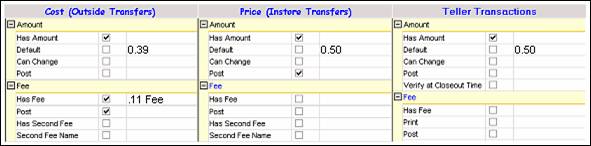
Once
you’ve decided when to realize the fee, the rest is easy. Just use the settings that I have in the
cheat sheets below. In the example, we
use a US Stamp that costs the store $0.39.
The store charges an $0.11 Fee, for a total of
$0.50 that they charge the customer.
Fee realized when brought into Vault.
This
is the more common of the two options.
When the stamps are brought into the store, the cost is 39 cents and we
immediately record the fee of 11 cents.
We are then carrying the stamps at 50 cents while they are in the
store. This means that as stamps are
transferred back and forth between the Vault and Teller Drawers, they retain
the 50 cent value— represented by the Price
(Instore Transfers) template. And,
they are still 50 cents when they are sold to the customer (Teller Transactions).
Looking
at the three templates below, you can see that the Has Fee option is only set for one of the templates, Cost (Outside Transfers). The fee is never realized when items are
transferred between the Vault and Teller Drawer. Therefore, you should never use the Has Fee option under the Price (Instore Transfers) template.
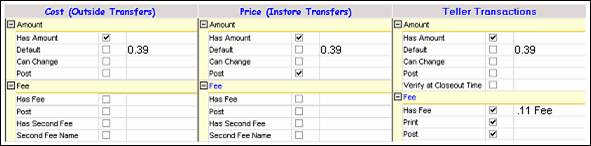
Fee realized at time of customer
transaction.
The
second viable option is to carry the item at cost, and realize the fee when it
is sold to the customer. The stamps in
this case would be valued at 39 cents when they are transferred into the store,
and would carry that same value as they are transferred back and forth between
the Vault and Teller Drawers. It is not
until the stamps are sold to the customer that the 11 cent fee is
realized.
As
stated above, the Has Fee option is
only utilized on one of the three templates.
In the first example it was checked on the Cost (Outside Transfers) template, and now it has moved to the Teller Transactions template.
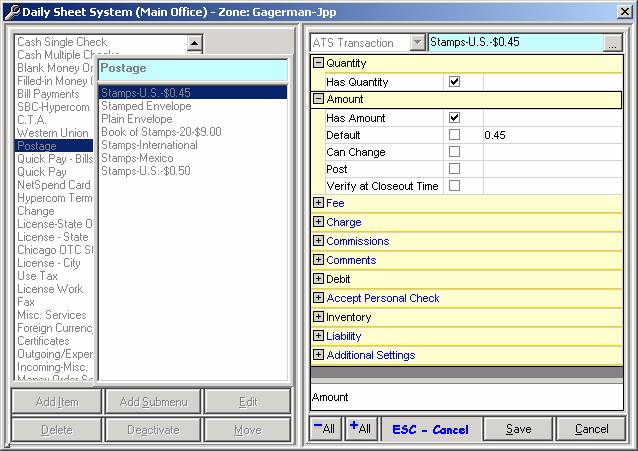
Vault Menu –What is set to Post?
There are several Post checkboxes throughout the
transaction templates. For each
transaction, there is a Post checkbox in the Amount, Fee, Charge, and
Commission sections. As you will see in
the Daily Sheet section, knowing when to check Post and when to leave it
unchecked is the key to having the daily sheets balance.

NOTE: New users often get the Post checkbox
confused with Inventory. The confusion
lies in whether checking Post affects the inventory count when the transaction
is processed. This is not the case. As long as the Inventory box is checked and
the correct item is tied to the transaction, the inventory value will be
increased or decreased accordingly—regardless of whether Post is checked.
Transfers between the Vault and Teller
Drawer
Remember that transfers
between the Vault and Teller Drawer are represented by the Price (Instore Transfers) template.
Whenever inventory is transferred from the Vault to the Teller Drawer,
that item should post “Outgoing” on the Vault Daily Sheet. For the same transfer, a corresponding item
posts “Incoming” on the Teller Daily Sheet.
This makes sense because the value simultaneously shifts (with one
increasing and the other decreasing) for these types of in-store transfers.
The Price (Instore Transfers) template should always be set to post. There
is never a time when inventory is transferred between the two without also
affecting the value of the Vault. The
value shifts back and forth as the inventory is transferred back and forth.
Bringing Inventory into the Store
The Cost (Outside Transfers) template represents movement between the
Vault and Banks/Vendors. There is no
hard-fast rule like in the previous example, but it is still relatively
straightforward when determining whether items in this template should be set
to post. It is all based on whether a
Money Order is used to pay for this particular item.
It is common practice to
print out a store Money Order to pay for inventory. Money Orders always post in the “Incoming”
section of daily sheets, because cash is generally collected in return for a
printed money order. Items that are paid
for by Money Order should not be set to post, otherwise
we would have two items post incoming (one for the transaction and one for the
money order). That would cause the value
to increase twice as much as it actually is and the daily sheets would not
balance. If a Money Order is not used to
pay for the item, then it should be set
to post.
Fees
No matter where the fee is
being realized, it is always set to post.
Section
3: The Teller Menu
Teller
Menu – The Basic Setup
In
order to account for the various types of transactions, a number of settings
must be specified when creating and editing them. Below are four different transactions as they
appear to the ATS user. Some have a Quantity field while others don’t. Some have an Amount and some only a Fee. Others have both an Amount and Fee. Certain types of transactions need a field
for Comments.
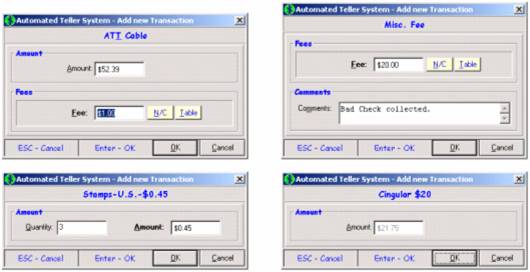
Only a handful of settings
are needed to create the various types of transactions. These are the same settings used in ATS Setup,
but here they apply to all the stores in a zone.
Quantity
When checked, it allows the
user to easily process multiples of this transaction. Typically, any item carrying inventory (like
stamps) or inexpensive services (such as making copies) would use the quantity
field.
Amount
The Amount field is used to record the value associated with this
transaction, and almost every transaction has an amount. The only exceptions are those that use a fee
to account for the entire transaction— the sale of a plain envelope is a good
example of this. Amount may post
incoming, outgoing, or not post at all based on whether the Post box is check marked (more on this
below). The initial value in the Amount
field is set to the Default value,
which the user can edit if the Can
Change box is marked. Finally, check
the box next to Verify at Closeout Time
to force the user to confirm this total when closing out the drawer.
Inventory
Use this option if the
transaction affects drawer inventory (meaning only those that have a
corresponding position in the Vault menu).
This is typically for the sale of an item, and the drawer inventory will
be decreased accordingly when the transaction is processed. To set this up, check the box and choose the
Inventory group from the drop-down list.
Be sure the spelling and punctuation matches the Vault Inventory
group.
Teller Menu –Fees, Charges and Commissions
The ATS system accounts for
the various types of service charges that are applied to transactions. Whether complex formulas are applied to the
amount or it’s just a simple flat rate, the first step is setting up a “fee
table.” This is described in detail in
the Fee Setup section below.
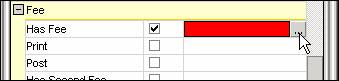
Fees
Include a fee by checking the
box next to Has Fee, then choose the correct fee from the table. Mark the Print
box to include the fee on the receipt.
Mark the Post box to post
this fee to the teller and/or store daily sheets. Add a second fee to this transaction by
marking the Has Second Fee box and
entering an amount.
Charges
A Charge is similar to a fee in that it is an extra amount collected
from the customer. The main difference
between the two is how they post and whether they are included in the store
money orders. Fees post in the fee
section of daily sheets and are not included in store money orders. Charges post (as a part of the amount) in the
incoming section of daily sheets and are included in the store money orders. Mark the Has
Charge box to include it in the selected transaction. Print
and Post are to print the charge on
the receipt and post it to the daily sheets.
Commissions
Commissions
do not add an extra charge onto the Amount.
Instead, a portion of the Amount is taken out and counted as the
Commission. Commissions post in the Fees
section of the daily sheets, with the remaining portion in the Incoming
section. Mark the Has Commissions box to include it in the selected transaction. Print
and Post are to print the Commission
on the receipt and post it to the daily sheets.
Teller
Menu –Money Orders at Closeout
One
of the options in the menu template is Liability. This is used to print a money order at the
time of teller or store closeout. For a
transaction that uses this option, a running total is kept throughout the day
for the total value of the Amount
and Charge fields. Then, one money order prints for this amount
at the designated closeout.

Click
the plus symbol to expand the Liability section. Then, to enable the Liability, check the center
box. The existing liabilities are listed
in alphabetical order. From here, new
ones can be added and existing ones edited.
The Liability Group
A
different liability can be assigned to each transaction, or several transactions
can share the same liability. When the
same liability group is chosen for several transactions, one money order prints
for the total of all those transactions.
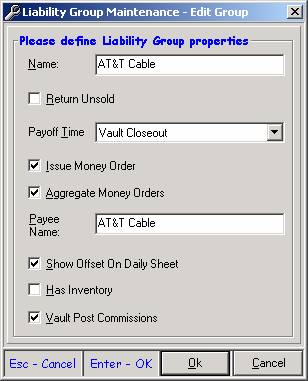
Show Offset On
Daily Sheet
Money orders always post
incoming-- this is key to understanding why a “Show Offset” option is
required. If a bill payment transaction
is processed for $100, and a money order is printed at closeout for $100, we
would now have two items post incoming totaling $200. This is twice as much as was actually brought
into the store and therefore poses a problem.
This is where Show Offset comes into play. By marking this checkbox, an offset posts in
the Outgoing section of the daily sheet for $100, bringing the daily sheet back
into balance.
The “One or Three” rule
An easy way to think about
Show Offset is to remember the “One or Three” rule. This rule applies to any
liability-transaction that is printing a money order at closeout. Basically, either one item posts to the daily sheet (the money order) or three items post to the daily sheet
(the money order, the amount, and the offset).
Like the statement in bold above, the money order posts no matter
what—there’s no stopping it. Whether the
“One” or the “Three” option is chosen, that money
order is going to print and it’s going to post.
The option for the owner (or accountant), is whether they want to see
the transaction amount on the daily sheet—if so, they must also use the Show
Offset to make the daily sheet balance.
Payoff Time: Teller Closeout or Vault
Closeout
When should the money order
print for this transaction? This is
based on store policy and the type of transaction. Either the money order prints at Teller
Closeout for the total amount that the teller brought in, or at Store Closeout
for the total amount of all tellers. The
money order (and the offset if there is one) posts to the Teller or Vault Daily
Sheets based on which option is chosen.
Teller Menu –What is set to Post?
The VALUE of the drawer
Remember that the purpose of
the Teller Daily Sheet is to reflect the value of the drawer. So, when determining which items should post,
think in terms of value. Does this transaction increase or decrease
the value of the drawer, or does it not have any affect? Be careful.
At first glance a simple transaction, like the sale of a stamp, appears
to be increasing the value of the drawer.
But did it really?
Inventoried Items
Inventoried items should not
be set to post for teller transactions.
Returning to our example of the sale of a stamp, the value of the drawer
is not affected at the time of the transaction.
The stamp, worth $0.50, is exchanged for $0.50. The value of the drawer did not change. When it comes to inventory, the only time the
value of the teller drawer is affected is when it is initially transferred from
the Vault to the Teller Drawer. This is
explained in the section above, Vault
Menu –What is set to Post?
Debit or Credit?
When cashing a check, the
value of the drawer is decreased— cash is handed out the window. When sending a fax, the value of the drawer
is increased—cash is accepted in return for a service. The Debit/Credit
item is used to distinguish between transactions that increase or decrease the
value of the drawer. Almost all
transactions in the menu are Debit
items; meaning they increase the value of the drawer. Cashing a check, and some expenses that may
be on the menu, should be set as a Credit. The Debit/Credit field determines whether the
Amount field will post Incoming or Outgoing on the daily sheet. It has no affect on Fees or Charges.
Fees, Charges, and Commissions
Fees, Charges, and
Commissions should always be set to post.
Once it is determined whether the transaction is set up with a Fee,
Charge, or Commission, mark that item to Post and don’t look back.
Section
4: The Daily Sheets
Daily Sheets – Behind the Scenes
Just as Transaction Templates
are used to set up transactions, Daily Sheet Templates are used to set up daily
sheets. These two different sets of
templates (Transaction and Daily Sheet) do not work independent of one another—
they are inextricably linked together.
Before we get into the nuts and bolts of configuring daily sheets, there
are some key concepts to understand.
This section describes in detail the connection between Transaction
Templates and Daily Sheet Templates, starting with the most basic unit— the TRN Link.
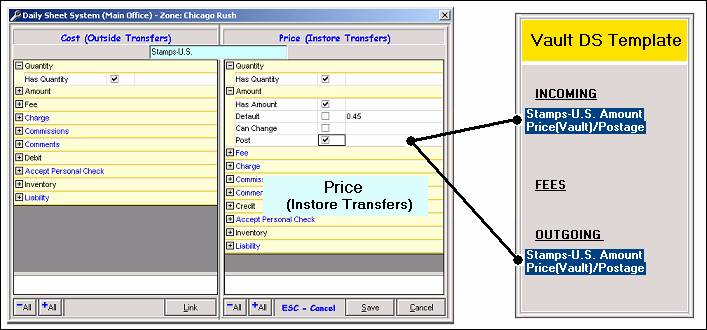
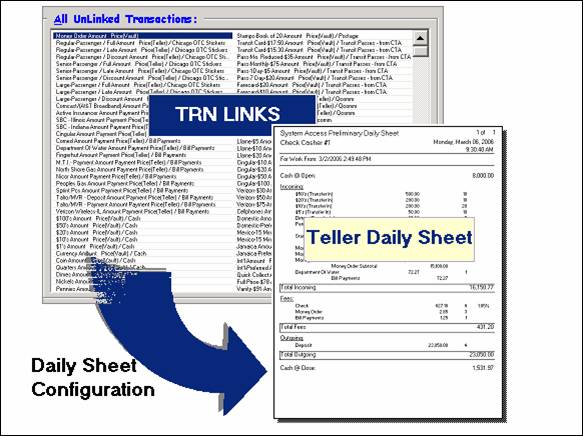
TRN Links
The Daily Sheet System uses
transaction links (or TRN Links). TRN Links can simply be thought of as a holder of value. Just as a piggy bank has value that can
change as pennies are added or subtracted, TRN Links hold values as
transactions are processed. When an
amount is set to post, for example, there is a corresponding TRN Link busy at
work behind the scenes. Every time that
transaction is processed, the amount is added on to the current value of the
TRN Link, just like adding pennies to a piggy bank.
Understanding TRN Links will
provide great insight into the inner workings of the Daily Sheet System. Let’s start by looking at an example.

Looking at the example above,
we have one transaction with three postable items and two TRN Links. The name of a TRN Link provides a great deal
of information as to which transaction it is representing, the type of postable
item (Amount, Fee, etc), the Transaction Template it came from, and the submenu
to which it belongs.
There is not a one-to-one
correspondence between transactions and TRN Links. For a single transaction, there can be
anywhere from zero to several TRN Links— it all depends on what is set to
post. In the example above, there is an Amount, Fee, and Charge— each
set to post. Does this mean there are
three TRN Links created? No. Just as there is not a one-to-one
correspondence between transactions and TRN Links, there is not a one-to-one
correspondence between postable items and TRN Links either. Postable items are
sometimes combined into one TRN Link, like Amount and Charge in this example.
Every daily sheet can be
divided into three sections— Incoming,
Fees, and Outgoing. Each TRN Link is
assigned to one and only one of these sections.
When it comes to configuring the daily sheets, these TRN Links can be grouped
together into one item or posted individually.
They can be sorted into any order desired. TRN Links cannot, however, be moved outside
of their section. If it is assigned to
the Incoming section, then it will remain in the Incoming section. If a Fee, it stays a Fee.
The Amount field posts Incoming for debit transactions and Outgoing for
credits. Fees always post to the Fee section. Charges
always post Incoming and combine with Amount if one exists. Commissions
post in the Fee section. Sales Tax posts Incoming. Offsets
(from liabilities) post Outgoing.
Transfers verses Customer Transactions
One of the Transaction
Templates deals with customer transactions while the other two deal with
transferring inventory. Customer transactions
tend to be in one direction— selling a stamp, printing a money order, or
cashing a check. A customer would not
come in with a stamp and sell it to the store, and they would not come in with
cash and trade it for a paycheck. The Teller Transaction template, therefore,
accounts for transactions that are cut and dry— they are either debits or
credits.
Transfers work
differently. A stamp can be transferred
from the Vault to a Teller Drawer and it can be transferred back the other
way. Bus Passes can be brought into the
Vault from the outside world, and they can be transferred back out if they are
not sold or expire. So what does this
mean for daily sheets and the TRN links they are made of?
For the two “transfer
templates”— Cost (Outside Transfers)
and Price (Instore Transfers)— any Amount set to post has two TRN Links. One posts in the Incoming section and one in
the Outgoing. This way, whether
inventory items are moving in or out, there is a place for them to post.
Comparing this to the earlier
example, we saw two postable items (Amount and Charge) combined into one TRN
Link. In this example, one postable item
(Amount) is divided into two TRN Links with one in the Incoming section and one
Outgoing.
TRN Links for the Teller and Vault Daily
Sheets
Remember that there are three
different Transaction Templates. Each of
these Transaction Templates contribute TRN Links to
the Teller Daily Sheet, the Vault Daily Sheet, or both.
The Teller Transactions template is for customer transactions that are
processed from the teller window. These
transactions have no affect whatsoever on the value of the Vault. Therefore, any item set to post from the
Teller Transactions template posts only to the Teller Daily Sheet. This was the example we used above for the
RCN bill payment and the TRN Links associated with it. Those two TRN links post in the Teller Daily
sheet and would not be found in the Vault Daily Sheet.
The Cost (Outside Transfers) template is linked only with the Vault
Daily Sheet. This template is for
transfers with the Vault and the outside world, so it makes sense that these
types of transaction would only post to the Vault and would not affect the
Teller Daily Sheet.
The Price (Instore Transfers) template is the special one. Transfers between the Vault and Teller
drawers affect both the Vault and the Teller drawers. Therefore, items set to post in this template
have TRN Links in both daily sheets.
So, the Vault Daily Sheet is
made up of TRN Links from two templates.
Anything set to post in the Cost
(Outside Transfers) and Price
(Instore Transfers) templates has a corresponding TRN Link in the Vault
Daily Sheet.
The Teller Daily Sheet is
also made up of TRN Links from two templates.
Any item set to post in the Teller
Transactions and the Price (Instore
Transfers) templates has a corresponding item linked to the Teller Daily
Sheet.
Daily Sheets – The Teller and Vault Templates
Configuring the Teller and Vault Daily
Sheets
The trickiest part of setting
up daily sheets (and getting them to balance) is deciding what should and
should not post. As long as everything
is set to post correctly, the Teller and Vault Daily Sheets will balance. Determining whether or not an amount should
post is described in detail in the Vault Menu
section.
Once all the postable items
are checked to post, long lists of TRN Links are ready to go. Configuring daily sheets can simply be
thought of as organizing these long lists of TRN Links into totals and
subtotals. The end
result being a logically laid out, readable daily sheet.
There are a whole set of
tools for the sole purpose of organizing TRN Links into Daily Sheets. In the figure above, these tools would be
represented by the blue arrow and are commonly referred to as the Daily Sheet Templates (which were
mentioned earlier). Now that you have a
firm grasp on the concepts of TRN Links and how they connect Transaction
Templates with Daily Sheet Templates, its time to actually configure a daily
sheet.
Click on the Daily Sheets menu. The Zone Selection screen
appears. Choose the zone that applies
and click OK.
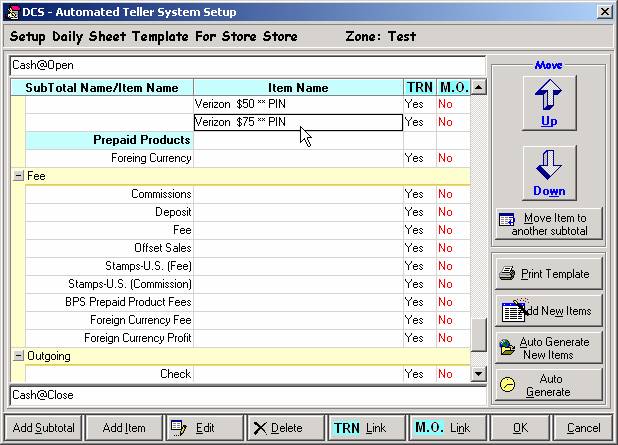
The level of completion that
you see here will be different for everyone.
It is based on whether this zone is already up and running or if it is a
brand new zone that has not yet been configured. No matter what zone or level of completion,
the basic layout is the same for everyone.
The template is divided into three sections— Incoming is at the top, then Fees,
and finally Outgoing. These sections can be expanded or collapsed
by clicking the little plus or minus next to the section header. Each row represents an individual item or a subtotal.
The items you see here are
not TRN Links— they are the totals of one to several TRN Links. They can be renamed by clicking the Edit button. The naming and organization of these items
will be the exact way it is displayed on the daily sheet. Each must have at least one TRN Link assigned
to it; otherwise it does not carry a value and cannot be saved. When multiple TRN Links are tied to one item
in the template, the daily sheet will show one total for all those links. To see the TRN Link(s) assigned to an item,
highlight that row and click the TRN Link
button.
TRN Links are grouped into
items, and items are grouped into subtotals.
Subtotals (leftmost column in blue) are the only rows that do not have
TRN Links assigned directly to them. Grouping
things together like this does not affect the balancing of daily sheets; it is
merely a way of displaying it differently.
The ability to have control over the layout of the daily sheet is no
small thing. It is very important to
most accountants and it is the sole purpose of the Daily Sheet Templates.
The two rightmost columns, TRN and MO, signify whether there is a TRN Link connected to this item and
whether there is a Main Office Link connected to this item. Main Office Links, even though they are
included here, are only needed in the Store Daily Sheet Template and are
covered in detail below.
First Time Setup
Initially, there will be no
items listed in this template. It starts
out with the three blank sections of Incoming, Fees, and Outgoing. In order to populate your template for the
first time, the Auto Generate
button is used. Be careful, if any
customization has been completed it will be lost by clicking this. Auto Generate
collects all the TRN Links from the relevant Transaction Templates and creates
a rough draft of sorts. It creates one
item (one row) for every TRN Link. The
only time this one-to-one rule is broken is if two transactions are named
exactly the same in both the Vault and Teller Templates. In this case, only one item posts that has
two TRN Links connected to it.
The naming of the items is
taken directly from the name of the transaction. The grouping into subtotals is also the same
as it is for transactions (with subtotals
equating to submenus). If no other work was done on the Vault and
Teller Daily Sheet Templates (besides clicking Auto Generate), they would both balance correctly— they
would just be more detailed than most people like. See the section below for info on changing
the names and grouping of items.
Adding New Items
When a new transaction has
been created and is set to post, the Daily Sheet Templates will not initially
have the corresponding item created. It
is not until Auto Generate New
Items is clicked that the system looks through all the TRN Links and
inserts any new ones into the template.
Daily Sheets – Grouping and Subtotals
Grouping several items into one
Owners (and their
accountants) often have specific requests when it comes to the layout and
organization of daily sheets. Sometimes
it makes sense to take entire submenus of transactions and group them together
into one postable item. Other times each
transaction should post individually.
Naming conventions also come into play as the wording and descriptions
in transaction templates wouldn’t necessarily make sense for the daily sheets.
To
group a number of items into one, start by deleting them. Highlight the row of each item one at a time
and click the Delete
button. Don’t worry; the TRN Links are
not being destroyed as you delete these items.
Anytime an item is deleted from the template, the TRN Link(s) assigned
to it are moved into a holding area for future use. The next step involves adding a new item and
assigning to it all those TRN Links.
Let’s look at an example.
Having
one item called “Bill Payment Fees” would make more sense than displaying the
fees of each company separately. It
usually makes sense to group fees together into single items like this. In the Fees section of the Teller Daily Sheet
Template, start by deleting all the bill payment fees.
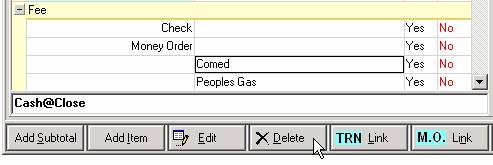
Highlight the item and click
the Delete button. A message box will ask if you are sure you
want to delete. Click Yes.
Repeat this for all the items that will be combined together.
The next step is creating a
new item that will display the lump sum of all those deleted items. Click the Add Item button and key in the name for this total; then
click OK.
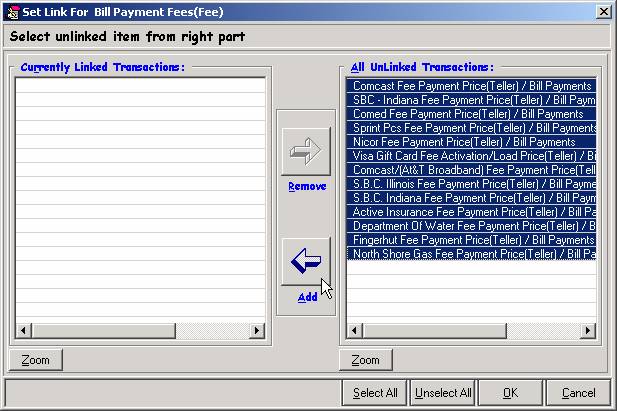
Currently Linked
Transactions
The
left side of the screen lists the TRN Links that are currently assigned to this
item. Because this is a newly created
item, it starts out with no TRN Links in this section. The reason this window comes up when adding a
new item is that every item must have at least one TRN Link assigned to it,
otherwise it would have no value. It
makes sense then that one of the steps in adding a new item is to assign it one
or several TRN Links.
All UnLinked Transactions
The
right side of the screen lists all TRN Links that are unassigned, or in what was
previously called the “holding area.”
Remember that TRN Links are locked into one of the three sections—
Incoming, Fees, or Outgoing. Because we
are adding an item to the Fees section, only unlinked Fees are available. Had there been some unlinked Incoming TRN Links, they would not be
seen from here. In the example of bill
payment fees, we have already deleted a number of items which sent their TRN
Links to this holding area.
Add and Remove
Add and Remove are simply used to move items between the left and right
sides of the screen. In other words, to
assign or un-assign TRN Links to this item.
The next step in our example, therefore, is getting all these TRN Links
from the right side of the screen to the left.
Use the Select All
button to highlight the entire list, this way clicking Add will send all of them over at once. Otherwise they can be selected and moved over
individually. Once these TRN Links are
assigned to the item, our work is done.
Click OK to save
changes.
Arranging Items and Subtotals
Once all items are set with
the correct TRN Links, the next step is arranging these items into a logical
order. Every row in the template is
either an item that has value, or a subtotal which is the sum of several
items. The leftmost column consists of
either subtotal headings or items that are not part of a subtotal. The center column consists of items that are
part of a subtotal.
Up and Down
The two arrows move the
selected item up or down one row in the template. They can be used to move an item within a
subtotal, out of a subtotal, and into another subtotal. Let’s look at an example where Pennies is selected and the down arrow
is pressed three times.

Pennies is currently in the Cash subtotal. All items that are part of a subtotal are in
the middle column. The subtotal those
items belong to is at the bottom of that list and in the left hand column. The down arrow is pressed for the first time.

This moves it down one row,
making Pennies the last item in the Cash subtotal. Clicking the down arrow again removes the
item from the subtotal.

Now the Pennies item does not
belong to a subtotal. Anything in the
leftmost column is either a subtotal or a standalone item. The third click of the down arrow moves it
into the Postage subtotal, which is the next subtotal beneath Cash.

Obviously, it doesn’t make
sense to leave Pennies as a part of the Postage subtotal, so the Up arrow can be used to move it
back to its original position.
Daily Sheets – The Store Template
The Store Daily Sheet
displays the opening cash, any item that affects the value of the store, and the closing cash. Cash value of the store at any given time
should equal the total of all the Teller Drawers and the Vault.
The layout and functionality
of the Store Template works just like the Teller and Vault. There are three major differences though,
each described here.
Built on top of Teller and Vault Daily
Sheets
The Teller and Vault Daily
Sheets have a direct connection with the transaction menus (when an item is set
to post, a corresponding TRN Link is directly available from the
template). This is not the case for the
Store Template. Instead, the Store
Template consists of all the items in the Teller Daily Sheet Template and all
the items in the Vault DS Template. The
Store Template does not have direct access to the TRN Links.
When a new transaction is
created and set to post, the item must
be added to the Teller and/or Vault DS Templates before it can be added to the
Store Template. This is because of
the reason just stated—the Store gets it’s info from the Teller and Vault DS
Templates. So, if it hasn’t been added
to the Teller or Vault, the Store will not have any way of recognizing that a
new item is set to post.
Items left unlinked
In the Teller and Vault DS
Templates, there should be no TRN Links left unlinked. Every item set to post should have a valid
spot on those daily sheet templates. The
Store has one main type of transaction that will be left unlinked, and that is in-store transfers. Because the Store picks up every item in the
Teller and Vault DS Templates, it ends up with a few more items than it
actually needs. While in-store transfers
(inventory transfers between the Vault and Teller drawers) do have an affect on
the value of the Vault and of each drawer, they do not have an affect on the
value of the store. You can transfer
items back and forth all day long and it won’t increase or decrease the value
of the Store.
To remove any in-store transfers
from your menu, highlight each inventory item and click the TRN Link button.
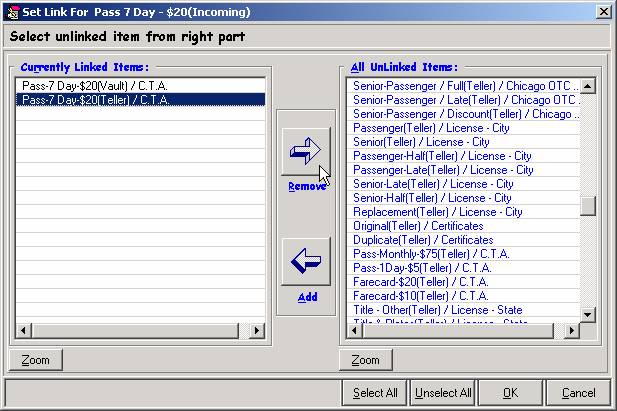
Two linked items will
initially reside on the left side of the screen. One is from the Vault DS Template and one is
from the Teller. The Vault item
represents movement in and out of the Store as inventory arrives or is sent
back. So, leave the Vault item and remove the Teller item.
Main Office Links
The rightmost column in the
three templates is labeled M.O. (for Main Office). This column goes unused in the Teller and
Vault templates, but the Store template must use this in order to connect the
Store Daily Sheets with the Main Office Template. When the Store Daily Sheets are sent to the
Main Office, the value of each line item needs to know its corresponding place
in the Main Office template.
Once a new item has been
added to the Store Template, click on the M.O.
Link button.
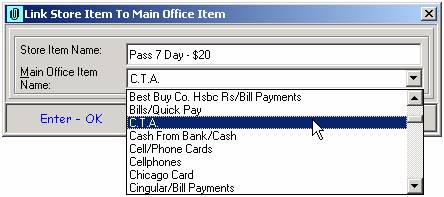
Find the corresponding item
from the drop down list.
NOTE: If none of the items
match accurately, it may be necessary to create a new link from the Main Office
Template. This is accessed by clicking
the Daily Sheet Setup button.